How to assemble Paimio chair
パイミオチェアの組み立て方

This is the 008 Paimio chair set after completion. Here’s how to build it…
パイミオチェアとその背景が組み上がったところです。組み立て方を説明します。


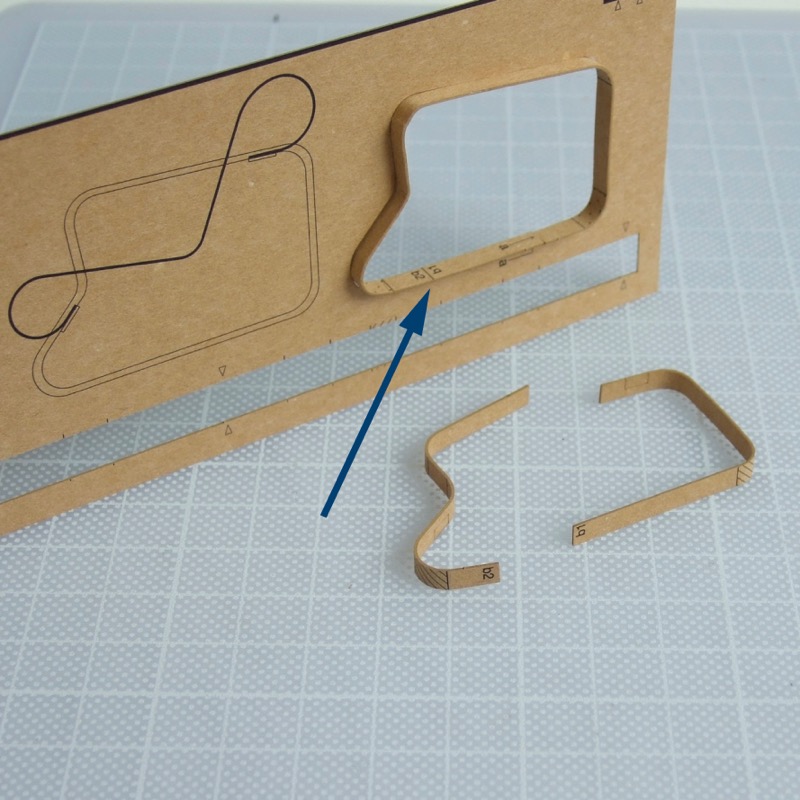
There are three cards in the package, together with assembly instructions. Detach all parts of the chair from the centre card, using a craft knife/scalpel – connections are indicated by little triangles.
3枚のカードと組み立て説明書が1セットです。まず、椅子の台紙から、三角形で示している「つなぎ箇所」をカッターなどで切り落とし、パーツを外します。

First of all, assemble 2 loops of legs and arms. The longest strips will be the outer layer of the loops. Using the template in the card as a guide, as below, place ‘a’ on leg to ‘a’ on card.
まず、足とアーム部になる木の色のループを2つ、組み立てます。外側になる一番長い部品を、矢印 aの位置を起点にして台紙にあいている穴に沿わせてはめるように、線で区切られた部分にカーブをつけていきます。

Curve defined areas between two lines – dotted areas for inside curve and hatched area for outside curve.
ドットは「内カーブ」、斜線は「外カーブ」です。机の角などに指の腹で押し付けて、少しずつ成形してください。


It is best to use a sharp solid corner, press and roll each piece with the ball of your thumb, then smooth the curve with a thin round stick. And place the outer layer inside the template.
テンプレートの内側に沿うよう、小さい曲げには細い棒などを使ってループの曲線を再現し、穴の内側にはめます。
Curve the inner layer with printed ‘b1’ and ‘b2’ letters. Place each letter against the division line in between, check the curves are nicely overlapped. Apply glue in between the layers, filling the curves especially, and leave them in the template until dry.
b1とb2の印刷があるループ内側の部品も同じようにカーブをつけます。それぞれの部品のb1とb2の文字が重なるように、矢印の線を境にして中にはめこみ、カーブが重なることを確認したのち、2枚を重ねて接着します。枠の中に入れたまま、乾くまで待ちましょう。

Assemble the other loop in the same way. Then shape the back-and-seat curve using the template for guidance. Roll the laser half-cut areas firmly, until they stay in shape without holding. Colour the cut edges of the seat with a Black pen, to make a nice finish.
同じ手順で2つめのループも組み立てたら、座の部分の曲線を作ります。台紙の側面図を再現するよう、レーザーで溝の切られている箇所に棒などを当て、手を離しても曲線がしっかり定着するまで形づくります。座の両端の紙の地色を黒のフェルトペンで塗ると完成がよりリアルになります。

Refer to the side view to locate the black coloured crosspieces. Glue them level with each end of the seat. Adjust the length of the sticking out ends equally.
側面図を参考にしながら、ループと座をつなぐ黒い横桟2本を座の部品の両端にそろえて接着します。両側に飛び出る距離が同じになるよう、調整してください。0

When the crosspieces are dry, assemble the loops and seat together. Locate the Black seat crosspiece in between the two lines inside the loop. Glue it in the position where the end of the crosspiece is in the middle of the width of the loop.
横桟の接着が乾いたら、座とループを組み立てます。3部品を下の写真のようにひっくり返すと作業しやすいです。ループの内側に2箇所、レーザーの線で貼り付け位置があります。まず背側の横桟を上の写真のように、はしがループの幅の中心にくる位置に接着します。

In the same way, glue the back end to the loop, in between two lines under the arm. As a result, there are little spaces between the seat and the loop, as arrows show.
同じように隙間を残しながら、座の下の横桟も、ループのアーム部の下にある2本の線に合わせて接着します。上の矢印の場所、ループと座の間に1ミリ弱の隙間が残っているのが目安です。

Attach the final piece in wooden colour – glue it to connect the back of the two loops, at the middle point of the back legs.
最後に残った木の色の横桟1部品を、ループの両側をつなぐように、脚部の真ん中の高さで断面どうしを接着すると、でき上がりです。

Adjust any twist or distortion, and add some glue to the connections from inside. Leave it under tape or clip and wait for it to dry.
ゆがみなどを補正しつつ、接着の弱そうな箇所を補強して、クリップなどで押さえて乾くのを待つと、きれいな仕上がりになります。

You may want to colour the edge of the seat with black pen at this point – be careful not to touch the loop.
この時点でエッジを黒く塗ることもできます。その時は、ループにはみ出して塗らないよう注意しましょう。

The last step is to assemble the wall and floor. Please refer How to assemble background, and fold open the air-ventilation windows to complete.
壁と床を組み立て、換気窓を少し開けると完成です。詳細は背景の組み立て方を参考にしてください。